Thursday, August 31, 2017

free digital print for you!

Hey friends! I've got a free print for download today. Regardless of what you are going through, whether it's big or small- I just wanted to throw a little hope, courage and strength your way. 


Download the 8 x 10" print HERE


Or you can download a sheet of postcards HERE

Wednesday, August 30, 2017

creating with janna- hand drawn greeting cards


Hello, my name is Janna Werner, and I am a mixed media creative from Oldenburg, Germany. I started my creative journey in 2010, at that time I discovered Alisa´s blog – I have been following here since and signed up for many of her online classes. Alisa´s creative process and projects always amaze me and they definitely influenced my work.

I recently joined Alisa´s Watercolor Blooms class and thought it would be fun to incorporate the shapes and colors into a papercrafting project – hand drawn greeting cards.
I made two different version, for the first I am drawing directly onto the card, for the second I cut out handdrawn shapes and arrange them in a dimensional setting.


Before I start drawing on a card, I like to practice in a sketch book. I try to come up with different shapes, patterns, colors and pens. If I mess up – no problem, it is a sketch book, right?!

No need for fancy pants, you can absolutely use cheap felt pens. I prefer edding and ecoline brush pens, as well as KOI markers as the tips are more flexible and easier to handle. For starters cheap pens are a great alternative, promised! 

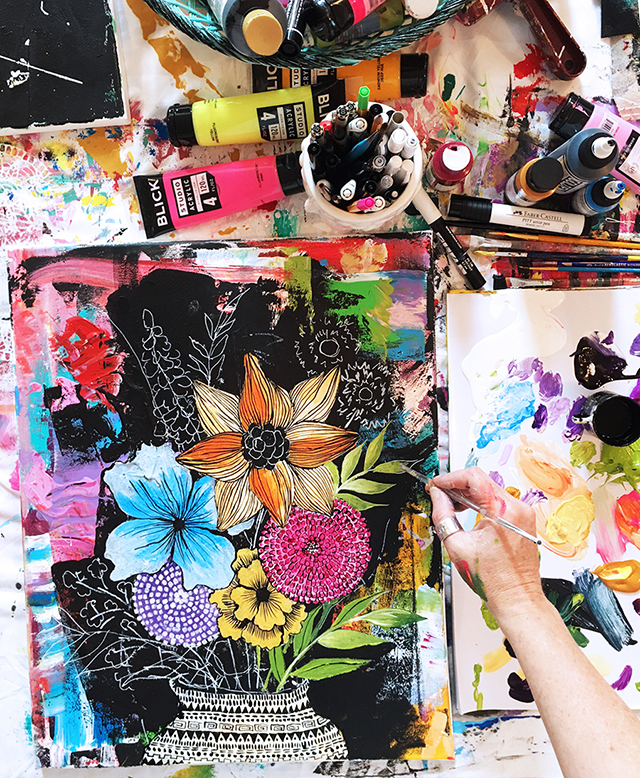
I draw in my sketch book, before using the markers on a project. Each brush pen and marker tip is different. As you can see in the photos, I draw leaves by pressing the tip onto the paper. The more flexible the brush is, the bigger the strokes and therefore the leaves.


After trying out the pens and deciding on the colors I would like to include in the drawing, I come up with a tiny scribble – just to get an idea what the drawing could look like. Then it is time to transfer the scribble onto the card and start drawing until I am happy with the result. I place the bouquet in the center of the card, with the flowers arranged diagonally for a more interesting look. The handwritten sentiment, Alles Liebe’ is German and means lots of love’.


I also use flowers and leaves on the second card, but this time I use scissors to cut them out. Instead of outlining the shapes just as I did in the previous card, I rather leave a small white border. This allows the elements to breathe and adds a more subtile look to the project. The dimensional bouquet appears more vivid and interactive than the one on the other card. The white branches where cut with a die cutting machine.

I glue the elements onto the card base, using liquid glue as well as dimensional foam dots for more depth. I write a sentiment with a black brush pen and create a small banner from it. 

These are two easy to create cards, both unique and very different from one another. As you can see, I worked with very simple shapes – inspired by nature. I highly recommend checking out Alisa´s Watercolor Blooms and Cut & Create online classes , there are tons of inspiration.


Thanks so much for joining me today, I hope this tutorial inspires you to get your markers and brush pens out and start drawing. I would love to see your projects, scribbles and process photos, so please tag me on Instagram with @jannawerner

Love, Janna

http://jannawerner.de

Tuesday, August 29, 2017

a peek inside my art journal- use those words

I run into a lot of people out there who want to keep a sketchbook or an art journal but they are not comfortable drawing. My advice is to use your words! Free writing, quotes and song lyrics are a great place to start getting creative on those pages. You don't need to know calligraphy or fancy hand lettering, just use your hand writing and see how many different ways you can turn those words into art.


Monday, August 28, 2017

end of summer sale!


Happy Monday friends! This week I've got my annual END OF SUMMER SALE happening over in the shop. Details below!

A percentage of profits from this sale will go to Hurricane Harvey disaster relief.

                                               Head on over the shop HERE


ABOUT MY ONLINE CLASSES:
There are many online workshops out there at different prices with different content. Back in 2009, when I decided to offer an online learning option, I set out to create a structure that is similar to taking a "live" class from me.  My mission is to provide an affordable class with a learning environment where you are watching lots of demos, learning techniques and then creating on your own art.

FACTS:
  • I have three different structures of online classes: 
Large Class: These classes are $50 and have 5 HUGE lessons that include videos, photos, written information, prompts and more. My large format classes dive deep into a variety of techniques, projects and information.
    Mini Class: My mini classes cost $30 and have 3 HUGE lessons that include videos, photos, written information, prompts and more. 
    Micro Class: These classes cost $15 and have 1 HUGE lesson that includes videos, photos, written information, prompts and more.
    • My classes are a combination of video learning (with demos, techniques and me talking) and lots of photo steps outs of inspiration, techniques and process.
    • All classes are all filmed in my studio. Since 2009 I have been tweaking my gear and my process with the hope that video/photo content gets better and better. My #1 goal is to provide inspiring lessons and visuals that are easy to understand.
    • My classes do NOT have a required supply list. Instead I share the supplies that I like to use and then give you a variety of options and inspiration to use supplies that work best for your process and your budget.
    • All of my classes have unlimited access which means that once you register you can create and access at any time and work at your own pace. Whenever I "release" a new class- I release each lesson "live". Many people enjoy working in this format, as the lessons are posted each week but once all information gets posted there is unlimited time to access everything. I have found that some people prefer to work along with the live format when I release a new class, while others will wait months until they have the time, money and the schedule to register for the class. Either way works- just know that once you are in- there is no deadline or pressure to create.

    Thursday, August 24, 2017

    how to start selling your artwork


    I get asked all kinds of questions about all sorts of creative things and once in a while I take the time to answer the frequently asked questions here on my blog!

    Something I get asked a lot is how to get started selling your artwork and today I am the best advice I can give


    1. BUILD A BODY OF WORK
    Before you even start to think about selling your art or craft, you MUST have a good body of work! Now, this is going to look different depending on the things you create but it really helps to begin with enough art or products that look and feel like a cohesive collection that best represents you and your style.
    TIPS:
    Take time to develop your style before your jump into selling your art.
    Be patient with this process! Taking time to really identify your style will save you the trouble of needing to change things further on down the road. 
    Challenge yourself to create a collection of art or handmade items. I like to think of a collection as enough products to fill an online shop or a good amount of paintings that can be added to a portfolio. 

    2. TAKE GREAT PHOTOS OF YOUR WORK
    Taking great photos of your work is one of the most important ways to capture the things that make your art unique. Over time and experience, I have learned that good lighting will make all the different in a photo. My #1 rule is to always have good lighting. This means I try to use as much natural light as possible and I never use flash.
    TIPS: 
    Try finding a window or place that has natural light and use this spot to photograph you work. Keep in mind natural light changes over time and can be affected by weather. I like to shoot photos in front of a window with the light source at my back. 
    If using natural light is not an option, then you might want to invest in some soft box lights. Having lighting will enable you to take well lit photos at any time of the day. I use these lights in my studio. 
    When taking photos of products use backgrounds that are simple. I like using white butcher paper in natural light because products appear bright and crisp in photos.
    3. LOOK FOR OPPORTUNITIES IN YOUR COMMUNITY TO SELL YOUR ART

    Trying to sell your work in a gallery, small boutique, craft bazaar or art festival is a great way to experiment with showing and selling your art and craft. This process can be intimidating and even scary but it can also be a valuable way to interact with the public, get instant feedback on your work and gain experience selling. While this topic could be a post in itself I want to at least share a handful of ways to get started.


    CRAFT SHOWS and ART FESTIVALS:

    TIPS:  
    Creating stock well in advance is really important. Most customers shopping at a art festival or craft show are looking for lots of inventory to shop from. Creating a lot of products and offering variety will attract customers. 
    Prepare and plan out your booth ahead of time! Different shows have different booth requirements so make sure you are aware of the required size and if there are any rules or regulations for what you can bring or set up. Laying out your booth and setting it up ahead of time (not when you show up the day of the show) will help for a smooth set up process when you arrive. 
    Get creative with your booth display! Color, unique signage, interesting and ways to display our work will only help to attract shoppers into your booth.  
    Have a variety of products at different price points. 
    Know how to price your work. A simple formula to follow- TIME + MATERIALS= COST 
    Make sure you have tags for your products, business cards, unique or fun packaging- all these things make a customer shopping at a craft show feel a little more special.  
    Have a mailing list sign up available for customers to sign. 

    GALLERIES:
    I am going to start by saying that getting your work into galleries or even getting a solo show is can be hard and it typically isn't something that happens right away. Often you need to grow a body of work, build your portfolio, network with galleries and start small. In my experience, having worked in galleries and museums, I've found that this world is a little (dare I say) pretentious (just my opinion) and it can be a tough world to break into. But once you get your foot in the door, more opportunities can open up. Thankfully the art world is changing and these days it seems like there are more than just galleries that hang, show and sell art. Restaurants and coffee shops, even office buildings and unique stores show and sell fine art.
    TIPS:  
    When it comes to showing your art it often means starting small. Don't limit yourself to only looking for BIG opportunities at popular galleries- sometimes the little opportunities can lead to bigger things. 
    Put together a comprehensive portfolio- digital and hard copy. This way you can email or send your work to potential contacts and opportunities. 
    Always keep your portfolio updated and fresh. Add new work as you create it and try to challenge yourself to create art that could be appealing for a gallery or an art show. 
    Do your research! These days galleries have websites where you can access their information and many of then even have a place to submit your work. 
    Don't be afraid or discouraged by small opportunities to show or hang you work. Each of these smaller opportunities can be used to build your creative resume.
    Think outside the box! Maybe you don't have galleries in your community but do you have other places and spaces that need art for their walls? Try getting creative and BRAVE and approach local businesses that might be a good fit for your work. 

    RETAIL OPPORTUNITIES:
    Getting your art or handmade goods into shops and boutiques is as simple as walking in and asking to speak to the manager. This method takes a lot of courage (and often a manager might not be there) so email is another great way to reach out to retail opportunities. 
    TIPS: 
    Made sure you understand pricing. When selling your work, retail buyers often take a percentage of your sales so you MUST be strategic when you set your prices.  
    Depending on what you make, you may find that it's not profitable to sell certain products. But with a little planning you can tweak, adjust and even come up with new products so that it works for you.
    Knowing your customers and where your work fits will help you find the right retail opportunities.  
    Have a price list with great photos of your products all ready to go- this can be sent via email if you have inquiries about your work. 
    4. CREATE AN ONLINE SHOP 
    One the the quickest easiest way to sell your handmade goods (or even services) is by opening an online shop. The internet is such a great resources for connecting with customers all over the world. These days creating an online shop is super fast and easy.

    TIPS: 
    NAME YOUR SHOP: Some artists use their names while others will come up with a shop name. If you are naming you shop, try to choose that name carefully because it will stick with you and your business for a LONG time.
    BRANDING:  Branding your shop- in other words create a look and feel that represents you- will only help you to stand out amongst all those other handmade shops. A logo, an eye catching banner, photography, the brand of your shop should look cohesive and feel like you! 
    GOOD PHOTOS:  Customers browsing and shopping online typically have a short attention span and that it why good quality photos are so important when putting your work online. Photos that are good, clean and clear of visual clutter will help your shop look professional. 
    BE PATIENT: Don't expect sales to happen over night! As hard as it is to accept, opening an online shop requires a lot of patience, trial and error and experimenting with marketing. 
    PRICING: Take time to price your goods. Your first priority should be making a profit and as tempting as it is to keep your prices low (really low) in the long term (after time spent making, marketing, shop fees, packing and shipping), it will be worth it price things higher or at least high enough so you make a profit. 

    5. UTILIZE SOCIAL MEDIA
    Social media is one the easiest ways to market and spread the word about the products or services that you offer. It is also a great way to connect with other people out there. While there are all kind of ways to get creative with social networking here are the things that seem to work the best:

    FACEBOOK: Facebook is a great tool for building readership, marketing your work and even building a community centered around your business and the things you share. To begin, make sure you have a facebook page. Take it it a step further and promote the things you share on your page. Anything from links to your blog posts to inspiring images, quotes, your products are all things you can share on facebook. Try not to over promote- instead try to create a place where your friends can check in and see what you have going on. I've got to be honest, I am not a big fan of facebook but for me it has helped get the word out to fans, readers and customers. Facebook has become one of many marketing tools that I lean on when I need to spread the word!
    TWITTER: LIke Facebook, Twitter is another tool to spread the word. Posting links to your blog content, your online shop or your website is pretty much a no brainer but using Twitter is a great way to connect with your readers in a more personal way. Posting things that inspire you, little tid bits about your day, your creative process, your life helps your readers feel more connection to you and your everyday life. Take it a step further and follow bloggers and personalities in your industry. Tweet and retweet those people and the content that they share. This is a great way to make connections and build your community.

    INSTAGRAM: Instagram is one of my favorite social networking tools. Because I love to take photos and I'd rather share something visual than come up with something to say. Connecting with customers through Instagram is a marketing tool that I utilize more than anything else.
    TIPS: 
    While it is great to have innovative and creative content to share often what you need more than anything is to get a good flow of regular posts, updates, links and information to share. I recommend posting at least once a day but posting more is even better. 
    Engaging with your customers and audience, while time consuming, is a really easy way to connect, relate, help and interact with the people that support you! Comment back and forth, answer questions, comment on things other people share. This is a great way to understand your customers, understand what they want, connect and create a network with like minded creatives. 
    Don't oversell yourself! You are welcome to disagree but there has to be more to your message and the things you share than just trying to sell, sell, sell. Try finding ways to let your customers in to your process, your personal life and your voice.

    Have a question you want me to answer? Feel free to leave a comment or email me alisaburke@gmail.com


    To read more about my journey as an artist-

    jump start a creative career- HERE

    taking a leap into full time artist- HERE

    coping with creative burnout- HERE

    coping with failure- HERE

    how to keep your work authentic- HERE

    the art of chasing a dream- HERE

    managing life and a creative business- HERE

    the art of setting goals- HERE 

    the art of blogging- HERE and HERE

    the things I haven't shared- HERE

    stronger than I ever knew- HERE

    Wednesday, August 23, 2017

    watermelon slushee

    I don't drink alcohol but that doesn't mean I can't enjoy a fancy beverage! Once one of my  favorites is a watermelon and cucumber slushee. It is sweet, refreshing and perfect for a summer day.


    INGREDIENTS
    2-3 cups of frozen cubed watermelon
    1/2 cucumber 
    1 cup of coconut water
    Mint leaves for garnish
    Sugar for garnish

    In a blender combine watermelon, cucumber and coconut water.
    Add ice if you want to thicken it up.
    Garnish with lime and mint leaves.
    I added cane sugar to the rim of the glasses.


    Tuesday, August 22, 2017

    5 things that can be used instead of a paint brush

    I love painting with a brush but there is something really fun and exciting about ditching those brushes and using alternative tools and supplies for painting! Here are five of my favorite things to use instead of a paint brush.


    BRAYER
    A brayer is one of my favorites tools for applying paint because you have the ability to spread uniform layers of paint onto a surface. I love rolling that color onto paper or canvas when I want to quickly fill that surface with color.


    PALETTE KNIFE
    A palette knife can be a really fun alternative to using a paint brush! Typically a palette knife is used for mixing paint but it can also be used to apply paint. These days there are all kinds of palette knives (and even decorative scrapers) with different tips and edges that can be used in many creative ways.


    FINGERS AND HANDS
    One of my favorite ways to apply paint is to use my hands, my fingers and my arms.There is something so raw and powerful about using your hands to apply paint and the best part is that there are no other tools or materials that make a mark like your own hands!


    ANYTHING FROM NATURE
    I love using anything from nature (flowers, leaves, twigs, feathers, etc) dipped into paint to use instead of a brush. Flowers and leaves make wonderful tools to create really expressive marks and lines.

    CREDIT CARD OR CARDBOARD
    I LOVE using an old credit card, gift card or piece of cardboard to drag, swipe and scrape paint onto a surface. It is such a fun way to add quick, colorful and expressive layers to a painting. 

    Monday, August 21, 2017

    butterfly rings

    As many of you know, I LOVE shrink plastic! There are so many different ways to use it and one of my favorites is using it to make funky rings. There are so many different things that you can create from shrink plastic and I thought butterflies would make super cute little statement rings.

    I started by drawing butterflies on a sheet of shrink plastic. While shrink plastic comes in many colors, I used black shrink plastic and a white paint pen. Keep in mind that you will need to use permanent pens on that shrink plastic.

    Next, I cut out the butterflies and then I baked my designs in the oven for about 1 minute at 350 degrees. Shapes and designs will shrink a lot- like 50%.


    While they were still warm, I softly bent the wings up to give the butterfly a little bit of dimension.


    Once the butterflies cooled, I glued them (using a heavy duty glue) to ring backs.
    The result are really fun and whimsical rings!

    Looking for more ring projects?


    Wednesday, August 16, 2017

    free coloring page download for you!


    Hi friends! Today I've got a free coloring page for you!


    Download HERE  Happy coloring!


    You can find a whole bunch of more free coloring downloads HERE

    LinkWithin

    Related Posts with Thumbnails